Configuring a Supernode#
Contributor: Tim Wilkinson KN6PLV
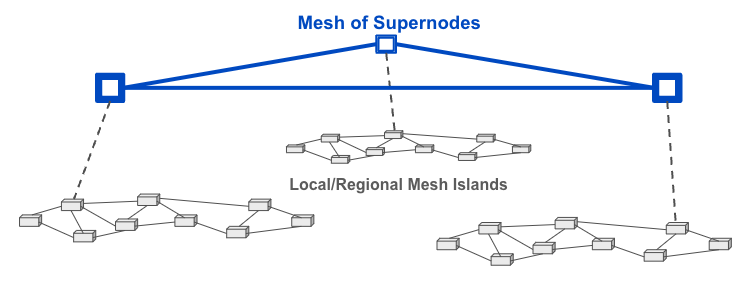
Supernodes are a way to link multiple mesh island networks in a safe and efficient way. A Supernode network is a high-level mesh network — super meaning “above or higher.” The Supernode network sits above the individual mesh networks and provides connectivity without increasing the routing load on the local networks. Supernodes do not merge networks into one big mesh but instead isolate connections between discrete mesh networks. For further information see the Supernode Architecture section of the Network Topologies topic in the Network Design Guide.
Criteria for Deploying a Supernode#
Before you consider deploying a Supernode, make sure you can adequately support the level of uptime that is desired for the Cloud Mesh network.
Fast unlimited Internet connection. Fiber is preferable. Low latency between Supernodes is important as is available bandwidth. A Supernode can easily transfer 1 teraByte of data every month, so an unmetered connection is best.
Uptime stability. The Supernode should be up 99.999% of the time. The location should ideally have backup power and network connectivity, both to the Internet and to the local mesh.
Reliable local mesh connectivity. As this will be the path for all traffic between your local mesh and every other mesh, the connection to your mesh should be at a high-bandwidth location. If you are deploying a Supernode with any sort of high-bandwidth backbone, the Supernode should be connected to the backbone.
Coordinating Supernode Deployments#
As more Supernodes are deployed linking more local networks, the overall performance of the Cloud Mesh will be impacted. Therefore, you should coordinate the deployment of Supernodes among the Supernode owners at the time when tunnel links are requested for the Cloud Mesh. Your goal should be to choose one or two Supernode peers for your Supernode so that you can establish primary and backup links to the worldwide mesh. Having more than three or four peer Supernode links will only add unnecessary traffic to the entire system without providing actual benefit.
The number of messages a Supernode receives will scale linearly with the total number of nodes in all connected local networks. A Supernode receives a management message from every node in the network (all nodes in all local networks) every 5 seconds. With a typical message size of 100 bytes, a Supernode receives about 20 bytes per second per node. At the time of initial testing, there were 4,300 AREDN® nodes registered world-wide, so a Supernode for this network would receive 84 KB/s or 0.7 Mb/s, which is a manageable bandwidth requirement.
You may have multiple Supernodes on your local network, but each Supernode should only be connected to a single local network. By having each Supernode connected to only a single local network, the owners of each local network are responsible for their own Supernodes. This simplifies management and maintenance. There is also some fault isolation since a failed Supernode will only impact the one local network to which it is connected.
Setting up a Supernode#
Typically a Supernode is configured on a dedicated Cudy TR3000, OpenWRT One, or Virtual Machine, although Supernodes can also run on Mikrotik hAP ac2/ac3 hardware. Its sole task is to serve as a node on the Supernode network. The local network is linked to the Supernode using a DtD link on a LAN port. The Supernode is dedicated to this task, so it should not be used for anything beyond its role as a Cloud Mesh gateway.

The following steps are required to configure a Supernode.
Start with a device that is newly flashed with the latest Nightly Build. If the node has been previously configured or used beforehand, please reflash and start fresh in order to avoid problems later in the setup process.
Configure the Supernode with a nodename prefixed with your callsign followed by a location identifier as well as the word “SUPERNODE.” For example you could use
AB2CD-NYC-SUPERNODEorAB6CD-LAX-SUPERNODEEnsure that the Supernode’s radios are
off|disabledProvide a reserved or static IP address for the device’s WAN connection to your Internet routing device.
Do not add any other configuration settings at this point or you may encounter problems later in this process. At this point you can
Commityour changes and reboot the device.Login to the rebooted device via ssh or telnet to get a command line prompt, and then manually type and execute each of these commands:
# uci -c /etc/config.mesh set aredn.@supernode[0].enable=1
# uci -c /etc/config.mesh commit aredn
# /usr/local/bin/node-setup
# reboot
Your node should now be functioning as a Supernode. To validate this you can do the following:
Login to the Supernode via ssh or telnet and type the following command:
cat /etc/config/aredn
Toward the end of the file which will be shown on the screen you should find the following lines:
config supernode
        option enable '1'
If you do not see these lines, please start this process again from the beginning and make sure to follow every step in the sequence.
- Things to Avoid
Here are several things NOT to do when configuring your Supernode.
Your Supernode must not use any cross-links (xlinks) to other nodes
Your Supernode must not have tunnel links to any non-Supernode devices
Your Supernode must not have its radio(s) enabled
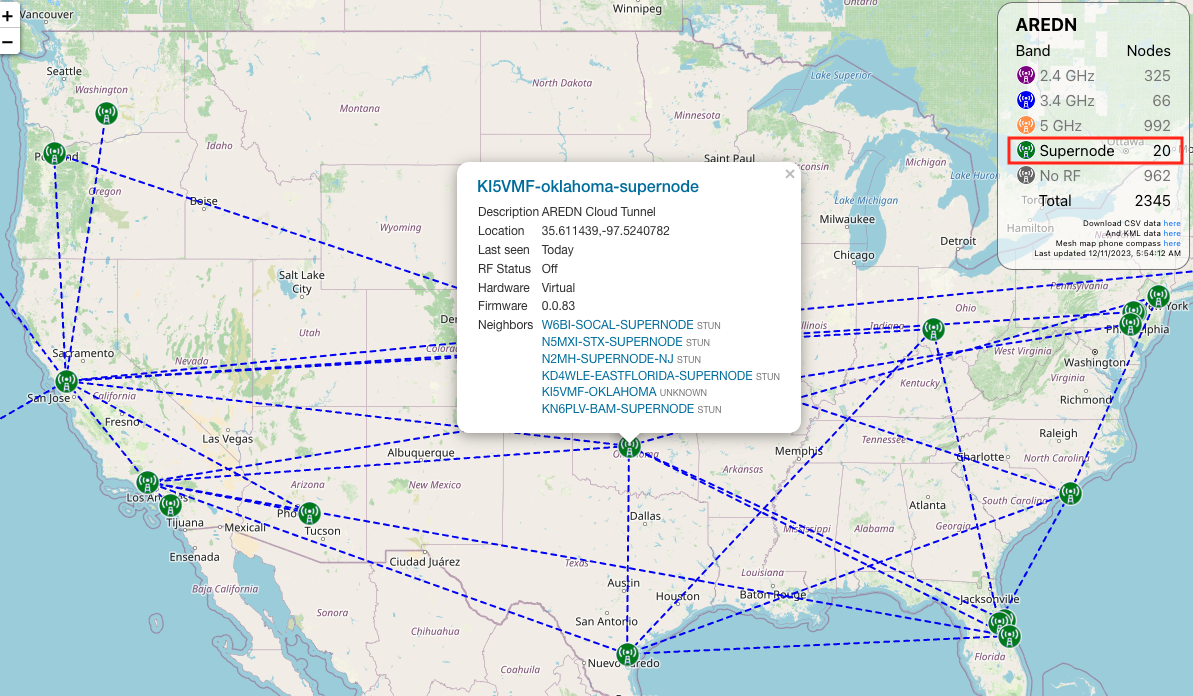
Before proceeding, make sure all the previous steps have been completed successfully. Now you should be able to connect to another Supernode using a tunnel. The easiest way to do this is to ask another Supernode owner for a set of tunnel client credentials. Your node can use either a client or server tunnel link. Supernode owners can be identified from the Supernode Network Map
Configuring a Supernode Peer Tunnel#
Supernode tunneling uses the Wireguard tunneling protocol, but the port range begins with port 6526. On your Internet-connected router/firewall set the firewall rules to permit UDP traffic from the Internet on an appropriate range of ports. The starting port should be 6526, which will provide for one supernode tunnel connection. If you want to allow up to 10 Supernode tunnel links (for example), then you would permit UDP traffic on the range of ports between 6526-6535. Configure a port forwarding rule to send any traffic from the Internet on your range of ports to the IP address of your Supernode’s WAN interface.
44Net and Supernodes#
44Net addresses from ARDC can now be used within an AREDN® mesh for LAN devices. To allow these to be accessible across the supernode network, supernode will automatically route 44.0.0.0/9 and 44.128.0.0/10. However, if you are using 44Net address for other things in your network, this can cause problems. To disable this feature on your supernode do the following:
# uci -c /etc/config.mesh set aredn.@supernode[0].44net=0
# uci -c /etc/config.mesh commit aredn
# /usr/local/bin/node-setup
# reboot